


It's time for another Friendzy Friday over on the Two Scrapbook Friends Blog and Forum, so I'm here with a quick tutorial for creating accordion hearts.
Most of us have created accordion flowers of varying shapes at some point and Christa gave us a great Freindzy Friday recently for one variety, but I quite often use accordion hearts on cards and scrapbook pages, to add a 'heartfelt' variation to this popular embellishment.
Here goes:
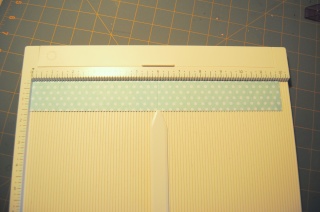
1. First I determine the overall finished size of the heart by deciding upon the width of my strip of paper. For this example I've cut a strip 1 1/2" tall, and as always, I keep the length to 12". This size works great on scrapbook pages as it's quite a good size, however it's probably a little large for cards, so I tend to reduce the measurement to 3/4" or 1" by 12".
2. Score the strip of paper at the 6" point and fold.
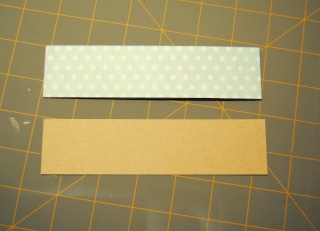
3.We then have to create a template, so I cut a piece of cardstock the same size as the folded paper I'm working with.....in this case 1 1/2" by 6".
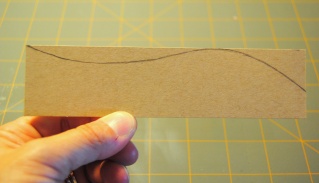
4. On the 'template' card, we need to freehand draw the following shape.......it doesn't have to be perfect as long a it follows the general outline.
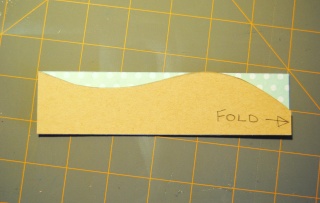
5. Cut out the template, then place on the folded patterned paper and cut around the shape.
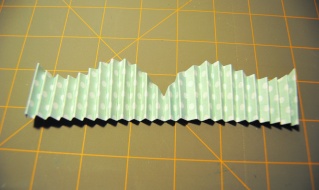
6. Open out the paper and proceed to score at regular intervals, as you would to create any accordion flower. I score at 1/4" intervals, but the choice is yours.

7. Accordion fold at the score lines and you should end with something like this.
8. Glue the two ends together to form a circle.
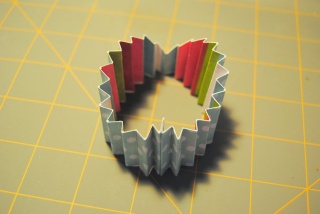
9. Press the circle flat to create the heart shape....remember, the straight edge should be in the center and the curved edge on the outside. The narrowest part of the strip can be a weak point and possibly tear, so I tend to hold this section as I press the heart flat. I also usually cut an extra smaller circle to adhere the heart to and keep things in place.

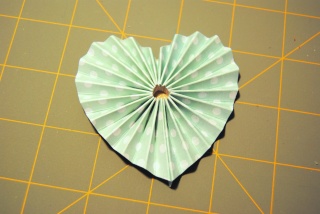
You can then add gems or buttons etc...........

This little card uses a perfect image and sentiment from Bugaboo , and made it's way to my parents for their wedding anniversary......I know they'll appreciate the humour.........46 years and still going strong (the sentiment says it all! :)
These hearts also look great on layouts where the options are endless for what you can add on there...........

I do hope you'll give these a try as they really are super easy, and you can re-use your template over and over again.
Have fun and I'll see you next time,
Jayne.x.

9 comments:
Oh these are wonderful!!! Thanks so much for showing how to make them.
That card is funny, and the layout is gorgeous.
I hope you manage to sneak in some crafty time soon. ;-)
I'm not going to lie, this BLEW MY MIND!!!!! I'm off to give it a try!!
Love this tutorial Jayne. I am so inspired. I must agree with Christy: It blew my mind!
WOW!!! This is awesome, and I must try to make one! I love the pumpkin page with the colour combination of orange and blue! The card is just too funny!!! Your tutorials are always straight-forward and easy to follow, thanks so much!!
Wow!! Fantastic Jayne! Thank you for sharing.
xx
Wow! This is great!
Thanks for sharing and will be trying it out and linking back to your blog! :)
I found this technique posted on Pinterest. VERY cool, thank you for sharing it! I also gave you props on my blog with an example of my heart. http://oscrappyday.blogspot.com/
wow this is really cool! thanks for sharing how to do it. =)
this is great. i cannot wait to try this!
Post a Comment