Monday, July 30, 2012

A 'Manly' Birthday.

Good morning.

Time for another card today and this time it's the 'manly' variety!

I don't colour too many male images because they're usually not cute.....obviously (!), and you may have guessed by now, I like cute.  However, one image I quite often colour up, because he is cute in that 'want to rub his bald head' kinda way is 'Maurice' from Pollycraft.

The male members of my family are probably getting a complex by now, wondering why they're quite often sent cards of a man sporting very little hair and a well rounded tum.  No offence to my Dad (although if the cap fits.........), this latest version was given to him for his Birthday.


I did try to soften the blow a little via the sentiment, printed from Word.


Maurice is coloured with Copic's and papers are from a My Minds Eye 'Six by Six' pad.


That's all for today, but I'll be back in a day or two, with scrapbook pages I think.

Till then, have a good one,
Jayne.x.

Friday, July 27, 2012

TGIF and I'm back!

Well it's pretty obvious that my good intentions of 'blogging' regularly did not come to fruition!  However in all fairness.....technology is to blame!  I don't seem to have the magical touch when it comes to anything electrical at the moment (do NOT mention washing machines!!!!) and have been without Internet since the weekend.

However, the lovely people from my cable company have sorted things out (5 days later, but who's counting!) and I'm back baby!

So, I have plenty to show you, but I'm going to be a tease of course and spread things out......that way I have an excuse to visit more regularly!

Starting today with a card.  Another bookmark card to be precise........nothing extravagant, but I did enjoy colouring with my Prisma pencils/OCMS again, so here goes.


The image is another super cute one from Saturated Canary.....I confess I may have purchased one or two new ones recently (!) but this one has actually been sitting in my stash for quite a while, waiting for some colour.


Papers are mostly Prima with a touch of My Minds Eye thrown in there.  I kept things pretty simple, as the bookmark section  will of course eventually be detached and pressed between pages.


Well that's it from me, but before I go, I just wanted to mention there are lots of fun challenges starting today over on the Two Scrapbook Friends Forum, in honour of the 2012 Olympics starting in London, England.  There's sure to be lots of fun and plenty of inspiration to get your mojo moving, plus a little prize or two involved, so head on over to the forum and get started.

See you soon......I am off to the Laundrette again!
Have a good one,
Jayne.x.

Friday, July 20, 2012

Friendzy Friday at Two Scrapbook Friends - Accordion hearts

I know I've been a bad blogger recently, but the sun has been shining so nicely, and we've been enjoying my parents company, so what can I say?!!  I will try to behave from now on and visit regularly.....promise!

It's time for another Friendzy Friday over on the Two Scrapbook Friends Blog and Forum, so I'm here with a quick tutorial for creating accordion hearts.

Most of us have created accordion flowers of varying shapes at some point and Christa gave us a great Freindzy Friday recently for one variety, but I quite often use accordion hearts on cards and scrapbook pages, to add a 'heartfelt' variation to this popular embellishment.

Here goes:

1. First I determine the overall finished size of the heart by deciding upon the width of my strip of paper. For this example I've cut a strip 1 1/2" tall, and as always, I keep the length to 12". This size works great on scrapbook pages as it's quite a good size, however it's probably a little large for cards, so I tend to reduce the measurement to 3/4" or 1" by 12".

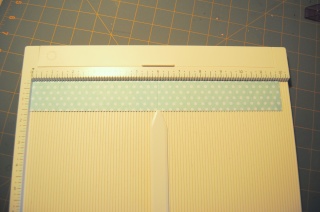
2. Score the strip of paper at the 6" point and fold.
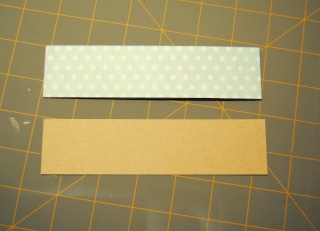


3.We then have to create a template, so I cut a piece of cardstock the same size as the folded paper I'm working with.....in this case 1 1/2" by 6".
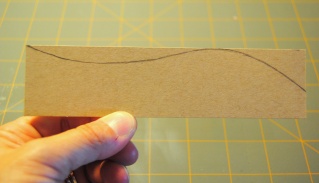


4. On the 'template' card, we need to freehand draw the following shape.......it doesn't have to be perfect as long a it follows the general outline.


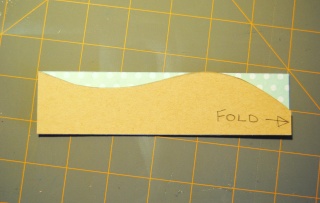
5. Cut out the template, then place on the folded patterned paper and cut around the shape.
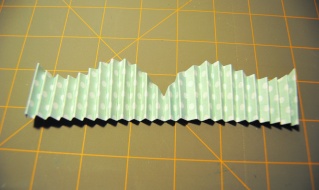


6. Open out the paper and proceed to score at regular intervals, as you would to create any accordion flower. I score at 1/4" intervals, but the choice is yours.


7. Accordion fold at the score lines and you should end with something like this.


8. Glue the two ends together to form a circle.
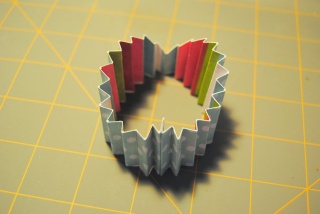


9. Press the circle flat to create the heart shape....remember, the straight edge should be in the center and the curved edge on the outside. The narrowest part of the strip can be a weak point and possibly tear, so I tend to hold this section as I press the heart flat. I also usually cut an extra smaller circle to adhere the heart to and keep things in place.


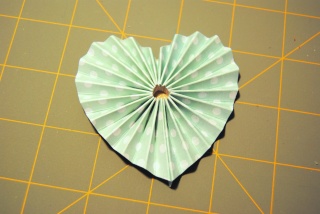
You can then add gems or buttons etc...........


This little card uses a perfect image and sentiment from Bugaboo , and made it's way to my parents for their wedding anniversary......I know they'll appreciate the humour.........46 years and still going strong (the sentiment says it all! :)

These hearts also look great on layouts where the options are endless for what you can add on there...........


I do hope you'll give these a try as they really are super easy, and you can re-use your template over and over again.
Have fun and I'll see you next time,
Jayne.x.

Monday, July 9, 2012

Snap Happy 'Old School' Style

It's time for another Crafty Challenge over on the Two Scrapbook Friends Forum, and today we're going Snap Happy but with a twist.......we're taking it back a few decades!

For my challenge I'd like to see a card or layout with a 'Polaroid' style shot on there.


Polaroid style photographs are a popular trend in scrapbooking right now, so there are many options available to create this look, without having to scour antique stores for an original camera.


Some paper companies (My Minds Eye for one) are even including images on their patterned papers, which can be easily cut out and used individually.


Picassa has a great tool in their program too, which enables you to print your own photographs in this style.


Another easy way is to create your own, by trimming your photographs and adding a wide matt of cardstock.  I used this method on a recent scrapbook page, and used the following dimensions:


Photograph 2 3/4" by 2 3/4"

Cardstock 3 3/4" by 3 1/8"

I have another scrapbook layout as an example for you today, and this time I used papers from the My Minds Eye 'Follow Your Heart' line.  I was able to cut a Polaroid frame from the images on one of the papers, and
I thought it would be fun to lay the frame directly over my 4"x6" photograph without trimming.


I also couldn't believe my luck when I found this metal heart embellishment in my stash.........a make n' take from Maya Road at Scrapfest earlier this year, which just happened to have the perfect colours to match the scheme on my page.


All the doily circles are fussy cut from another sheet of PP and there's a variety of fonts, together with stitching and a quick spritz of Maya Road mist.


An abundance of tags and more stitching............


And more of the above!


I hope you'll get to join in with this weeks challenge and don't forget to upload your creations to the Forum and Gallery in order to collect buttons toward your next gift certificate.


Have a great day and I'll see you soon,
Jayne.x.
Related Posts Plugin for WordPress, Blogger...